These are the Inventory items in the Inventory Item command, in the Inventory Items section of the Point of Sale (POS) Configuration menu. See Point of Sale (POS) Configuration Menu Overview.
Note: POS Inventory Items are different to regular Inventory items (equipment that you have on site, or items that you rent from an outside vendor).
These are the items in the Inventory Item Categories. For a retail shop Outlet, these may be the same as the Point of Sale (POS) Items, but for a restaurant, where Point of Sale (POS) Items are assembled from several different Inventory Items, the breakdown of usage is important. For example, a chicken dish offered may use two chicken breasts at a time to prepare. Here, every time that dish is ordered, if tracked as an Inventory Item, two chicken breasts would be removed from the Inventory total. The high and low point numbers of the Point of Sale (POS) Item can be entered here, so that once the quantity on hand drops below a certain number the Point of Sale (POS) Item can be added to a shopping list for re-purchase.
Select Inventory Items from the Inventory Items section of the Point of Sale (POS) Configuration menu.
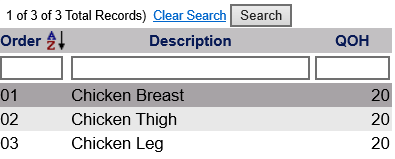
The screen display is split into two frames, with the left side of the screen listing any already configured POS Inventory items for the property and the right side containing the fields you need to complete in order to add or edit an Inventory item for the property. Any changes made on the right, once saved, will be updated in the listings to the left.
The currently configured Inventory Items options can be displayed by:
Order: This determines where the Inventory Item appears listed in the interface.
Description: The description of the Inventory Item can be sorted alphabetically or a particular Inventory Item searched for manually.
QOH: (Quantity On Hand): How many of the Inventory Item are currently in Inventory.
Selecting any Inventory Item will display the details on the right.
Your options include the following:
Generate a new entry:
Click the New  button from the toolbar to add a new Inventory Item.
Complete the fields described below.
OR:
Select an existing Inventory Item from the list on the left, and click the Replicate  button from the toolbar.
Then change the field information as described below.
Edit the current selection:
Change the field information described below.
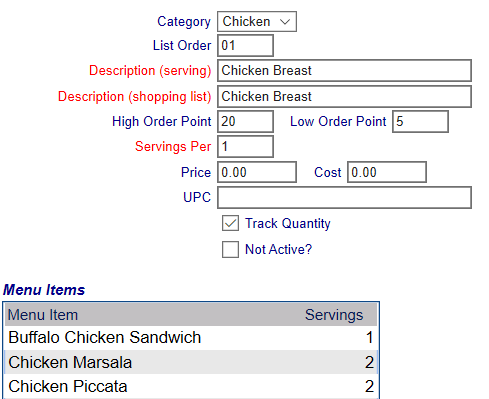
Category: This is the Inventory Item Category (as configured in Inventory Category - POS ). Any Categories available can be selected from in the drop-down menu.
This field is optional; if a Category is selected the Inventory Item will be displayed in the Fast Pick menu when that particular Category option is selected; this allows the Fast Pick category option to display a much smaller and more appropriate list of options to select from, improving efficiency.
List Order: This determines where each Inventory Item appears listed in the interface.
Enter a number into the List Order field.
This field is optional, however you may want to be sure to have them listed in an order that makes sense, such as all types of an item together (for example, chicken legs, thighs or breast).
Description (serving): Inventory Item Description.
Description (shopping list): Inventory Item Description for the shopping list (how it appears on any shopping list generated). See also Shopping List.
These fields are required, and may differ - for example, chicken breast may only be available for purchase in packs of 6.
High Order Point: This is the maximum inventory number of the Inventory Item you want on hand at any given time.
Low Order Point: This is the inventory number at which you wish to trigger the re-purchase of a Inventory Item.
Note: Be sure to set these numbers at points that will ensure you do not run out of an Inventory Item, but do not have an excess of stock on hand that can spoil or pass expiration dates.
Price: Shopping List Price.
This field is optional, if no cost is entered the default is 0.00.
Cost: Shopping List Cost.
This field is optional, if no cost is entered the default is 0.00.
UPC: This is used for a scanned item, and is typically not used for meals. Point of Sale (POS) Items for Outlets such as gift shops will typically be scanned items. The field is optional. If used, the UPC requires a symbol (for example #, %) in front of it to display correctly in the system.
Track Quantity: This box may be checked or unchecked. This enable you to track how many or a particular item you have in inventory- if this box is checked, any sales, spoilage or breakage will be automatically deducted from the QOH total. see also Quantity on Hand.
Not Active?: This box may be checked or unchecked. By default, it is unchecked.
It should only be checked if the Point of Sale (POS) Item is currently not in use.
If an option is currently not active (for example seasonal options) this box may be checked.
Once an Inventory Item has been added to the list on the left, it will remain in the list (cannot be deleted) if there has been any checks created for it. Once a check is created, it exists in several places in the system, and therefore there cannot be a check for something that does not exist.
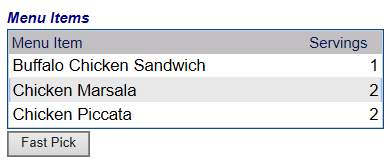
Menu Items: This section lists the Point of Sale (POS) Items configured as using this Inventory Item, and how many of each Inventory Item are used in the production of said Point of Sale (POS) Item. See POS Items Menu Item Set Up - Inventory tab.
Click the Fast Pick button to add the Point of Sale (POS) Items that use the Inventory Items, and manually enter how many of each Inventory item:
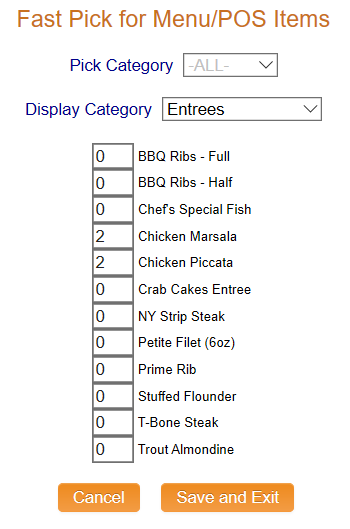
Once your selections have been made, click the orange "Save and Exit" button to return to the Inventory tab screen, where your selections will now be displayed.
You should be sure to do this for EVERY Point of Sale (POS) Item that utilizes the Inventory Item, to allow accurate tracking of quantities.
When you are finished adding or editing an Inventory Item, click the Save  button to save the changes.
To view any changes made, click the Activity log  button in the local tool bar.
Date Updated November 07, 2024